Converting Certificate to use CSP Storage Provider in stead of CNG Storage Provider
Certificates are used all over the world nowadays. And during development you often need to work with them. Certificates are also used to sign code, i.e. to add a verification to the exe/dll/msi that the file has not been tempered with and is an original from the creator of the software. This is called Authenticode. I have had multiple instances where the certificate that was to be used for Code Signing was a not compatible. This blog explains how to make it compatible. Certificates in Windows are stored using Storage Providers. Windows has two of these providers, that are not compatible. The old style “Cryptographic Service Providers” or CSP in short and the new style “Cryptography API: Next Generation” or CNG. The CNG providers have been around since Windows Vista, and although it is more secure and easier to use many software is still not compatible with CNG providers. Authenticode is one of the parts that does not work with CNG. For more information regarding CSP, CNG and their application support please refer to the linked blog.
In the instances I encountered the Code Signing certificate was always stored by a CNG provider and thus not compatible for Code Signing. Scattered around the internet there are bits and pieces on how to convert a CNG stored certificate to a CSP stored certificate, but there is no clear how-to. This blog will bundle all the bits into a single procedure to follow on how to convert the certificate.
Does this apply to your certificate?
The first indication that your certificate is not using the supported Storage Provider is the fact you cannot select it in Visual Studio when you want to use it to Sign a ClickOnce manifest. Also if you use SignTool.exe to sign your compiled files you get a message like “Invalid provider type specified”.
You can look up the Storage Provider that is used using CertUtil.exe like this:
CertUtil.exe -store -user my
The output lists all the certificates in your personal certificate store. Now look up your certificate.
================ Certificate 12 ================
Serial Number: 11a6ba37719e92
Issuer: CN=StartCom Class 2 Primary Intermediate Object CA, OU=Secure Digital Certificate Signing, O=StartCom Ltd., C=IL
 NotBefore: 19-5-2015 03:39
 NotAfter: 19-5-2017 16:38
Subject: CN=Remy Blok, L=Zoetermeer, S=Zuid-Holland, C=NL
Non-root Certificate
Cert Hash(sha1): 00 06 ec cf 74 59 02 40 3c ae 2f fd d0 5d 73 9c 45 09 52 2a
  Key Container = le-d4257650-d35a-42d3-a6c9-cf2dfb68120f
  Unique container name: 6496f04465f3121b928de311db4a22fe_d7bb06f0-3179-4636-b5ea-7aecd5c55471
  Provider = Microsoft Software Key Storage Provider
Private key is NOT exportable
Encryption test passed
Of the Certificates where you have a private key the provider is listed. in this instance it is “Microsoft Software Key Storage Provider”. On the MSDN you can look up what kind of provider the certificate is using:
- Microsoft Cryptographic Service Providers lists the default supported CSP providers. If one of these providers is outputted by
certutilthen you have a different issue and this blog does not apply to you. - CNG Key Storage Providers lists the CNG providers, but basically the only one you will encounter is the Microsoft Software Key Storage Provider.
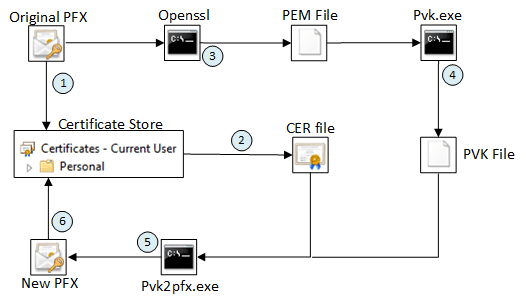
Process
The process is pretty easy and is depicted in the following image. Basically it is a process of stripping the certificate into separate parts and then combining them again into a valid certificate.
Prerequisites
As you can see there are some tool used in the conversion. Make sure you have the following tools installed.
- OpenSSL: it can be downloaded from the OpenSSL website. This was tested with version 1.0.2a but I suggest you take the latest version.
- pvk.exe is an application that handles the pvk files types and can convert from and to this file type. It is available on the following website.
- pvk2pfx.exe is part of the Windows Driver Development Kit. It is eventually installed in a directory similar to “C:\Program Files (x86)\Windows Kits\8.1\bin\x86”.
Steps
1. Import the PFX
If you don’t have the original certificate installed in your Certificate Manager then this is the first step. You can just open the PFX and import it into your personal store.
2. Export the public key
You need to export the public of the Certificate you just imported to a cer file.
- Right click the certificate
- Go to All Tasks => Export…
- In the wizard:
- Do not export the private key
- Select DER encoded binary X.509
- Save it next to you original pfx file
3. Export the private key
Next you need to export the private key of the certificate using OpenSSL. This will result in a pem file.
- Open a command prompt
- Go into the OpenSSL installation directory
- Execute the following command
openssl.exe pkcs12 -in <original pfx file>.pfx -nocerts -out <pem file location>.pem for example: openssl.exe pkcs12 -in "C:\certificate\original cert.pfx" -nocerts -out "C:\certificate\certificate.pem"- The requested Import Password is the password of the PFX file
- The requested PEM pass phrase is just temporary, but make sure you remember it for the following step
- Make sure you include the full paths to the pfx and pem files and watch the quotes
- It is easiest to keep the location of the pfx and pem file the same
4. Convert to PVK
Now the pem is converted is converted into a PVK file. PVK is a container for Private Keys that Microsoft uses.
- Open a command prompt
- Go into the directory where you placed pvk.exe
- Execute the following command
pvk.exe -in <pem file location>.pem -topvk -strong -out <pvk file location>.pvk for example: pvk.exe -in "C:\certificate\certificate.pem" -topvk -strong -out "C:\certificate\certificate.pvk"- The requested PEM pass phase is the phrase you entered in the previous step
- The requested Password is just temporary, but make sure you remember it for the following step
- Make sure you include the full paths to the pem and pvk files and watch the quotes
5. Merging of Public and Private key
Now we have the Public key in the cer file and the Private key in the pvk file. Now these files are merged back into a single pfx file.
- Open a command prompt
- Go into the directory where you installed the Windows Driver Development Kit
- Execute the following command
pvk2pfx.exe -pvk <pvk file location>.pvk -pi <pvk password> -spc <pvk file location>.cer -pfx <new pfx file location>.pfx -po <pfx password> for example: pvk2pfx.exe -pvk "C:\certificate\certificate.pvk" -pi temp -spc "C:\certificate\certificate.cer" -pfx C:\certificate\new cert.pfx" -po 1337HiddenPassw0rd!- The pvk password is the password you entered in the previous step
- The pfx password is the password for the new pfx file. Make sure this is a decent password or reuse the password from the original pfx
- do not override the original pfx file until proven the procedure was successful
- Make sure you include the full paths to the pvk, cer and pfx files and watch the quotes
6. Import and verify
Now you can import the newly created pfx file into the Certificate Manager. Make sure you remove the old certificate first from the Certificate Manager. Once the certificate is in place you can use certutil again to validate if the certificate is now correct.
If it now shows the provider as “Microsoft Strong Cryptographic Provider” you know the operation has been successful.
Make sure you delete the temporary cer, pem and pvk file, especially if you did not use strong passwords/phrases for the intermediate steps.
Now you are done and can use this certificate to sign your code.
Happy developing!